A Complete Beginner’s Guide to Commercial Photography for a Website
Hi! My Name is Jacob Meyer, and I work behind the scenes at OMS Photo. I am our marketing director and the person who developed this website and authored almost all its content. I am stepping out into the limelight to share some insights I’ve learned regarding websites and photography. Leading the marketing efforts of a photo studio like OMS is a real privilege. One great part of my job is that I have more than 10,000 amazing and unique images to use in my endeavors (no joke)! To top that off, I have a team of incredible creatives to produce assets for me when I ask politely.

Given my unique position, I want to share some of what I’ve learned working at OMS, watching our photographers get hired for projects, developing a few websites myself, and conversations I’ve had with some of the world’s greatest advertising minds. I hope it helps you and others like you get a grasp on the visual demands.
Although this guide is curated around a website’s needs, it also covers most of the major types of photography any organization will eventually require.
(TLDR conclusion at the end, but you’ll miss out on all the valuable tips)
A Website Photography Shopping List
Before we jump in, just know that you can break up every recommendation in the following article over multiple shoots and on your timeline — dive in where you feel comfortable first, and keep growing from there. OK, here we go!
Unless they’ve created dozens of websites, most people only have a basic idea of where to begin with the site’s visuals. You’ve probably worked hard building up your company and creating something your customers enjoy. The last thing you want is some expensive website covered in horridly cheap photos making it appear as if you don’t know what you are doing. I have managed the construction of about 20 websites, and I’ve seen many successes and a few failures. I personally developed the OMS site twice, and this current website is my pride and joy (and beast of burden, lol).
The following list is a dependable place to start planning your photography needs. After the list, I’ll describe and show examples of each type of photography.
- Product / Service Specific Photography
- For each product or service, 2-8 images of its features and usage.
- Website Banners
- 2-3 for the home page
- 1-2 for each product or service category
- Lifestyle Photography
- 10-15+
- You’ll undoubtedly want lifestyle photos that show your buyer how to use your product or service, and most importantly, how it affects your buyer’s life.
- Stock photos and illustration assets
- As many as needed to fill in gaps.
- I’ll point out when you can get away with stock photos and illustrations and when you can’t.
Product/Service Specific Photography
Whether it is a product or service, you need photos to show people what you have to offer. Product photography is usually where most businesses start their photographic journey. Given that products and services are different creatures, I’ll break my comments down by type.
For Products:
Product images are the last visual that customers will review before placing the product in their cart. You need 2-8 photos of the product on a white or solid-colored background. You should also get 1-3 pictures of it in use, which we’ll discuss in the section on lifestyle images.
The goal is to show how excellent your product is!

Product photos on a simple background are a must! It’s essential to have your product presented clearly, and most e-retailers require a plain white background (Amazon, Walmart, Zappos, etc.). But don’t let this limit you!


WAYS TO ELEVATE PRODUCT PHOTOS:
Excellent lighting and dramatic shadows can make a massive difference in the look and feel. A too evenly lit product with no shadows looks flat and like a computer rendering.
Use unexpected angles and zoom in on particular features. Photos of the front and back are only the start.
Unboxing photos are an excellent way to let your consumer see everything they will receive.
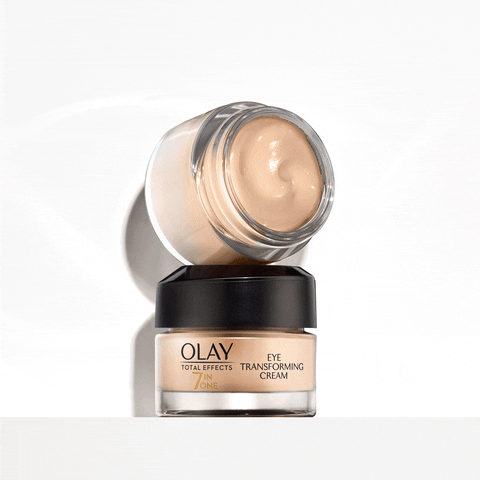
Animated photos (GIFS) are both delightful and informative. Consider showing a small function on your product. For example, we’ve created some nice animations for Olay where the lid rolls off.

INSIDER TIPS:
- Consider asking the photo retoucher to deliver final files with and without shadow on white (jpg), transparent (png), and light-colored backgrounds (jpeg).
- It’s becoming more regular and trendy to show products on light gray backgrounds or other light colors. I’ve heard from clients that this does improve sales, but I have yet to see a concrete study on the topic. Feel free to ask for more from your deliverables. Once the photo retoucher has stripped out and layered the shadows, changing the background slightly is no big deal (see warning below). It can be worth the extra costs!
- If you have photoshop (or an equivalent) and don’t mind paying a little more, you can ask for semi-layered TIFF files with everything in layers.
INSIDER WARNING:
If an image is a transparent PNG, you can place it on any background, BUT it does not mean it will look good. If you have a specific color you want to place a product on, please, for the love of Odin’s Ravens, tell the photographer to shoot it that way too! The problem is the color reflections on the product, or “color spill.” If you place a product photographed on white on a dark background, it will look off. It takes a decent amount of photo retouching to make it look natural in a different color space.
Service Photography:
Service-focused photography should revolve around your company, employees, and customers. You’ll need to create photography with your real employees or models acting like your actual employees for each service you offer.
The goal is to highlight steps in the customer journey!


A must-have here will be employee headshots you can use throughout your website so customers can see the real people on your team. These photos don’t have to be on white and bland! Check out some of the examples here:


In addition, service-focused photography can vary widely based on your industry and offerings. In the next two hypotheticals, I will list some ideas.
Hypothetical scenario 1 – a physical service:
Imagine you are a B2B company delivering construction services such as design, planning, and building roofs. You might want the following concepts:
- A staged scene of an employee going over plans with a client at a laptop inside or outside.
- A few photos of your factory or warehouse employees making the materials.
- A few pictures at a recently completed job site.
- A few images of your staff at work in their offices.
- You might want some headshots of your customer-facing sales team and leadership.
Hypothetical scenario 2 – a non-physical service:
You are a company that provides non-physical goods, such as a digital marketing agency or a software/app developer. Photography can seem a bit moot here, but getting your employee headshots is still a must, so other humans know they are interacting with humans too.
Also, your non-physical company might want to create a library of general office photos, conference room-style discussions, and examples of client interactions.
Without having a physical service/item to sell, it’s normal for companies to use stock photography and illustrations. Later I will discuss the merits of this despite its impersonal drawbacks. Having authentic photography is what it is. Authentic.
WAYS TO ELEVATE SERVICE PHOTOS:
Having a distinct art direction will significantly elevate the final results. Even a simple color and focal depth direction will make a massive difference in the deliverables.
Hire models to be the “heroes” while using employees and friends to fill in the rest. Putting non-experienced people in front of a camera can slow down a photo shoot while trying to get the right look. It can sometimes feel awkward too. On the other hand, if you exclusively use models, it can look a little inauthentic. The “hero” can be a model to represent the ideal customer (buyer persona) or “model-employee.” However, if you and your team love the idea of being on camera, go for it! Models are simply one tool in the toolbox.
INSIDER TIPS:
- Planning the photo shoot internally well in advance will set you up for success. A shoot with employees and work areas means everyone’s workday will be affected. Give everyone ample time to prepare, make a tight schedule, sign releases, and turn in it into a company-wide moment. When a crew and photographer show up with scarcely any planning on the client’s end, you can expect fewer deliverables and a potentially frustrating day.
- Please schedule a walk-through well before shoot day. It would help if you gave the photographer and yourself time to walk through the environments before the shoot day to increase a photo shoot’s efficiency and quality. The photographer will point out possible angles and compositions most people have a difficult time conceiving. This experience helps the photographer prepare the right lighting and equipment.
INSIDER WARNING:
- Please, don’t think photo editing will solve everything. Retouchers can fix quite a lot, from sprucing up people’s faces and wardrobe to cleaning up a messy room. However, This can lead to some unexpected costs due to the extra time. Please prepare the rooms, environments, and people the best you can. It can certainly be worth it to add a hair/make-up/wardrobe stylist to the shoot.
- Retouchers cannot change what is in focus after the shoot. Sometimes a photo looks great, but something important right behind the primary focal point is a little fuzzier than you would like, such as a logo or special equipment. I wish this were CSI, but it’s not. Making something out-of-focus to be in-focus can rarely be fixed in photoshop. Conversely, sometimes things in focus can be made out of focus and emphasize what is important. Be present during the shoot and nudge a photographer to capture the shot again with another focal point or depth. If the photographer knows to get both things in focus, they happily will! With the right photos, the retoucher can combine everything.
Website Banner Photos: The Fun Stuff!
Making visuals that land immediately is essential. Website banners that hit the mark takes a little bit of planning and having a brand’s message at the core. The intention here is to have photos that will work with some text or graphics over the top. You’ll want to get 1-3 images for your home page, and you should consider one for each one of your product or service categories. One of my favorite aspects of website banners is that they often make great billboards and digital ads too!
The goal is to hold a website visitor’s attention!

Banner design is where you need to let the creative juices flow (and does anyone else finds it odd creatives like to think of thoughts as being “juice”). Jokes aside, this does require some creativity, and if that’s not your forte, you can work directly with a photographer on your vision.
Alternatively, you can hire a creative designer/agency. If you would like some references for hiring creatives, please feel free to contact us (we know quite a few). Alternatively, you can skip ahead to the next section about lifestyle photography, which can work wonderfully for banners.
A simple place to start your design process is with a question, “what do I/we want to say?” I know that’s no small question, but without a clear answer, you’ll be on a journey with a broken compass. If you are lost and have plenty of time, Start with Why, by Simon Sinek is fantastic. If you are under a time crunch, keep it simple and focus on your company’s most exciting USP (unique selling proposition).
Once you know what the message is, it’s time to go out to the internet and start collecting photos you love and get together a classic mood board. Pinterest is excellent for this, and if that’s not your style, try creating mood boards with Canva. With your message and mood board ready, it’s time to make a shot list with fundamental guidelines on what you want for each banner photo. From there, it’s time to work with your creative agency or photographer to finalize the vision! Getting some experienced creative input makes a massive difference.
WAYS TO ELEVATE BANNER PHOTOS:
Check out the latest design trends and share what you like and don’t like with your photographer. They can often take your mood board and elevate it to meet the latest trends.
Bring your text overlay and graphic designs to your production meetings and the shoot. The photographers can overlay your design in our capture program, and you can see our photos live, being married to your plans. It’s pretty neat to experience if I do say so myself.
INSIDER TIPS:
- There is only so much time in a day, so keep your expectations realistic. If you want 15 banner images that all have entirely different backgrounds, props, and more, that could take more than a single day in the studio to get it right.
- A good goal is around 4-6 unique sets or scenarios in a day. Each different set can usually yield a few final photos. Start with your dream, then get with a producer and photographer to guide you on what’s possible within your budget.
INSIDER WARNING:
- Be ready to let go of your creative control a little bit. Micro-managing a photography shoot rather than relying on your creative director or photographer often slows down the day. I’ve seen a few photo shoots where the team hashes out every detail like a senate committee, and everyone feels exhausted. The client gets fewer photos in a day, the photographer has an unhappy client, and the creative agency feels frustrated. There is a lot of value in sharing opinions, and it will be your shoot. OMS is here to create visuals that validate your brand. We don’t want to discourage constructive feedback, only a reminder it’s ok to have a little faith.
Lifestyle Photography: The Extra Fun Stuff!
Lifestyle photography does three critical functions. It shows your product or service’s real-world mechanics, offers an aspirational message, and if you can pull it off, it has an inspirational message.
The goal is to show how your product or service will affect your customer’s life.

For your website and pretty much all other marketing materials, lifestyle photography is the glue that binds all your marketing efforts. Use it with product listing, services pages, homepage banners, advertisements, and more. I can not stress enough that you will want to use lifestyle photography everywhere you can. After all, we are humans, and we love to see other humans.
Photos to show how your product or service works:
A logical purpose for lifestyle photography is showing how your product or service works. For example, a vacuum cleaner sucking up some breakfast cereal on a carpet. Your customer needs to see how the product will perform in a logical and practical sense. You should already have a list of the most important ways a customer uses your product or service, and that’s a great place to start with a lifestyle shoot.


A simple definition of aspirational photography:
Aspirational photography shows what the world could be for the individual if they had your product or service. A commonplace example is most fitness advertisements. These ads are almost entirely centered on the customer being “a better you.” If you had a vacuum cleaner product, this could be a tidy family home where you can see the vacuum in the image, but the shot’s focus is on the mother with her two happy kids having a nice moment, with the message “less cleaning, more family time.”

A simple definition of inspirational photography:
Inspirational photography shows what the world could be if everyone uses your product or service. It’s that feeling when you buy a product to be a part of something greater than yourself. A great example is the optimistic mission of Life is Good apparel. They have both a mission to spread optimism to all, but every purchase comes with a charitable donation to help children worldwide. Inspirational photos show both the products and their impact on humanity. For the customer, a purchase means so much more than the product’s basic function or service.
WAYS TO ELEVATE LIFESTYLE PHOTOS:
Hey! If you didn’t read the tips at the end of the service photography section, you should check that out. The following considerations are tips in continuation of that section since there is substantial overlap.
–
Tell a customer’s journey through lifestyle photography. Go back to that moment when your ideal customer experienced an issue or discovered an opportunity, then follow that journey from beginning to end. Find ways to show how your company is the solution. Each step along the journey is worth trying to recreate in front of the camera.
At least show the dream your product or service can fulfill. Maybe telling the whole journey is a bit too big for you at this stage. If so, focus on the world after your customer has your product. Some of the most impactful marketing images are the ones that give prospects an exciting glimpse into their future.
INSIDER TIPS:
- Lean into your photographer. The experience a seasoned commercial lifestyle photographer brings to a shoot will blow your mind. I will never forget the first shoots I shadowed Monty Milburn and Matt Witherspoon. Simply amazing. They could see everything so clearly and move quickly through a variety of complex scenarios. They were willing to dive in, feel the moment, and get dirty to get the shot they wanted. Trust their judgment.
- Plan on lifestyle shoots yielding about 30-45 final images. How many scenarios you want to capture will directly affect this amount. Breaking down and traveling across a facility or a city takes time, so plan accordingly.
INSIDER WARNING:
- Watch out for model fees and buyout on lifestyle shoots. They are precious people to hire for a successful shoot, but adding multiple models can balloon a budget.
- Be present on the shoot and express yourself on what you want to see. Every photographer at OMS sees the genuine value in collaboration and validating the idea of our clients.
Stock photos and illustration assets
It’s probably apparent by now, creating all the photography assets so far described is going to cost some money. Spending all your marketing dollars right away on all of this can be a risky choice. One excellent option is to use stock photos and illustrations to fill your gaps until you can afford the next photo shoot. There is not much to say on this topic that isn’t common sense. Stock photos often look too much like stock photos, even the good ones. Therefore I would highly recommend using illustrations and graphics to fill in your gaps instead. However, stock photos work fine for landscapes, food or drink ingredients, background textures, etc. In my opinion, stock photos tend to look out of place when there is a staged activity in the photo. It’s also apparent when a site uses stock photos as each photo’s art direction tends to be substantially different and bland.
Tips for choosing Stock Assets:
- First, Explore stock sites like istock.com and adobestock.com. There a ton of other options, so feel free to explore the internet.
- Even check out free (CC0) websites like stocksnap.io and unsplash.com.
- Next, start saving photos and illustrations you like and specifically note the photographer/artist you prefer.
- Ultimately, you should choose your favorite photographer/artist and keep all your purchases tied to that individual. This choice will make your website design feel intentional, and you might even create the illusion you hired the artist.
- Connect with a photo retouching company to alter your stock graphics to work a bit better.
- Maybe you want a person to look more blurred out. Perhaps you want a retoucher to place your product on a table in the scene. Maybe you want some color changes to the illustration. Whatever the reason, having a reliable retouching team to manipulate your assets can make a big difference in the result.
Conclusion (TLDR)
If you scrolled down here to skip everything, here is the briefest list I can provide.
- Photography for your website spans a variety of photography types. The best way to plan is to make a list of your needs based on the following areas.
- Product and Service photography
- You need to show what your product or service is and how it affects your customer’s life.
- Push the photography and retouching team to create something high-end.
- Don’t ignore photography if you provide a non-physical product or service. Humans like to see humans, so consider team headshots and workplace photos.
- Try to get 2-8 photos per product or service.
- Website banners
- Create something well designed and collaborate with creatives such as photographers or agencies.
- Try to create 2-3 banners for the home page and 1-2 per product or service category.
- Get your message locked-down, and the rest will come easier.
- Lifestyle photography
- Lifestyle photos are the glue that holds your marketing message together. You need to show how your company affects consumers’ lives, logically, aspirationally, and (if possible) inspirationally.
- Try to get at least 10-15 images you can sprinkle throughout the website.
- Stock photos and illustration assets
- Use as needed but don’t overuse stock photos, or it will look like it. Be strategic with the subject matter and favor using stock photos for generic subjects like landscapes, food ingredients, background textures, and more.
- Illustrations are the way to go and are versatile. They will feel intentional if you purchase all your assets from a single artist.
- Get with a photo retoucher to customize stock assets to fit square pegs into round holes.
- Product and Service photography
Now what?
Make a plan that fits your comfort level and budget. If you are totally new to hiring photographers, start with product photos. There is no need to stretch yourself to get this all done ASAP. Then, reach out to your photographer, producer, or creative agency of choice and discuss your plan. Let them offer feedback, guidance, and quotes.

What are your questions? What did I get wrong?
You can contact us on our contact form, or you can DM us on Facebook or Instagram. From there, I will respond personally to every question.
Thanks,
Jacob Meyer